
In SQL, clearing out tables isn’t a one-size-fits-all task. The language gives you multiple tools—primarily DELETE, TRUNCATE, and DROP—each with completely different behaviors, performance profiles, and safety guardrails. In this comprehensive tutorial, I will show you how to remove data from an SQL table with complete authority and control.
How To Delete Data From Table In SQL
The Core Data Removal Weapon: The DELETE Statement
The DELETE statement is a Data Manipulation Language (DML) command. It is designed to remove specific, targeted rows from an existing table based on criteria you define. Think of it as a precise laser: you point it at a specific subset of data, and it removes those records while leaving the rest of the table completely untouched.
The Basic Syntax Blueprint
The fundamental structure of a DELETE command is straightforward, but its simplicity is exactly what makes it dangerous:
SQL
DELETE FROM table_name
WHERE condition;
Example:
Let us delete the data from the Customers table based on the where condition.
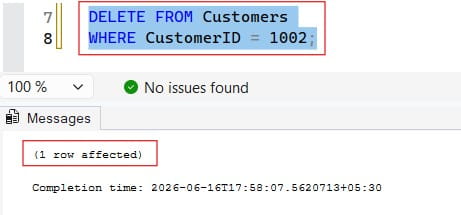
DELETE FROM Customers
WHERE CustomerID = 1002;
After executing the query above, I obtained the expected output shown in the screenshot below.
The Ultimate Rule: Always Use a WHERE Clause
If there is one absolute law I hammer into my students during technical training, it is this: Never write a DELETE statement without a WHERE clause unless you intend to erase every single row in that table.
If you execute DELETE FROM customers; without a WHERE constraint, the database engine will dutifully loop through the entire table and delete every single record, one by one. The table structure, its columns, its constraints, and its indexes will remain intact, but your data will be completely gone.
To target specific records, your WHERE clause can utilize standard comparison operators:
- Exact Matches:
WHERE account_status = 'Expired' - Numerical Boundaries:
WHERE loyalty_points < 100 - Date Ranges:
WHERE last_login_date < '2025-01-01' - List Identifiers:
WHERE user_id IN (1024, 2048, 4096)
Under the Hood: Transaction Logging and Performance
To understand why a DELETE operation behaves the way it does, we need to look at how relational database management systems (RDBMS) guarantee data safety through transaction logs.
When you run a DELETE query, the database engine executes a fully logged operation. This means for every single row targeted by your query, the engine does the following:
- It locates the row on the physical disk or memory page.
- It locks the row to prevent other queries from modifying it simultaneously.
- It writes a complete copy of the row’s original state to the database’s transaction log (Write-Ahead Logging).
- It marks the row as deleted.
Because the engine meticulously logs every individual row deletion, the process consumes a significant amount of CPU, memory, and disk I/O. If you attempt to run a raw DELETE statement on a table containing 50 million rows, your transaction log file can rapidly swell to hundreds of gigabytes, potentially freezing your database or running out of disk space entirely.
High-Volume Alternatives: DELETE vs. TRUNCATE vs. DROP
When you need to clear out massive tables, using a row-by-row DELETE statement is often the worst approach. This is where Data Definition Language (DDL) commands like TRUNCATE and DROP become essential.
The TRUNCATE TABLE Command
TRUNCATE is a high-performance alternative designed to empty an entire table instantly. Instead of scanning rows one by one, TRUNCATE bypasses individual records entirely. It simply deallocates the data pages associated with the table, wiping the slate clean in milliseconds.
Because it operates at the structural page level rather than the row level, it writes minimal data to the transaction log. However, this means you cannot use a WHERE clause with TRUNCATE—it is an all-or-nothing operation.
The DROP TABLE Command
While DELETE and TRUNCATE clean out the data inside a table, the DROP command destroys the table itself. It removes the rows, the indexes, the triggers, the permissions, and the very structural definition from the database schema entirely.
Critical Comparison Matrix
| Architectural Feature | DELETE Command | TRUNCATE Command | DROP Command |
| Command Classification | Data Manipulation Language (DML) | Data Definition Language (DDL) | Data Definition Language (DDL) |
Granular Filtering (WHERE) | Fully Supported. | Strictly Forbidden. | Strictly Forbidden. |
| Transaction Logging | Full row-by-row logging (Slow, heavy resource use). | Minimal page-allocation logging (Extremely fast). | Minimal schema-modification logging (Instantaneous). |
| Storage Reclamation | Leaves empty space allocated to the table heap. | Frees allocated space back to the database instantly. | Frees all physical space back to the operating system. |
| Table Structure Retention | Retains table schema and structural definitions. | Retains table schema and structural definitions. | Destroys table schema and structural definitions entirely. |
| Identity/Auto-Increment Keys | Keeps current identity seed sequence running. | Resets identity seeds back to their original starting value. | Obliterates identity columns alongside the schema. |
Safety Fail-Safes: Transactions and Defensive Coding
When you work in production environments, you must adopt a defensive programming mindset. Never trust a data removal query until you have verified its scope.
Harnessing Explicit Transactions
Explicit transactions are your ultimate safety net. By wrapping your code in a transaction block, you prevent the database from committing changes to disk permanently until you give the explicit green light. If you make a mistake, you can reverse the execution instantly.
SQL
-- 1. Begin the safety isolation envelope
BEGIN TRANSACTION;

-- 2. Execute the targeted data removal
DELETE FROM store_inventory
WHERE last_audit_year < 2024;

-- 3. Check the row count affected. If something looks wrong:
ROLLBACK TRANSACTION; -- Wipes out the deletion, data is restored!

-- 4. If the row count matches your expectations perfectly:
COMMIT TRANSACTION; -- Saves changes permanently to disk.
Using this workflow means that even if you accidentally drop a WHERE clause, a simple ROLLBACK command will instantly restore your data as if nothing ever happened.
The SELECT Verification Trick
Before you ever type the word DELETE, write your query as a SELECT statement using the exact same filtering logic.
If you want to clear out records for a vendor team in Dallas, execute this first:
SQL
SELECT COUNT(*), vendor_name
FROM vendor_ledger
WHERE regional_office = 'Dallas' AND active_status = 0;
Verify the resulting row count. If the SELECT query returns 45 rows, and that matches your administrative records, simply swap out the SELECT COUNT(*), vendor_name line with DELETE while keeping your WHERE filters identical.
Handling Relational Integrity: Foreign Key Constraints
Data removal rarely happens in a vacuum. In a relational database model, tables are linked together via primary and foreign key constraints to maintain data integrity.
Imagine you manage a corporate system where a primary accounts table links out to a child invoices table. If you attempt to run a query to delete an account row that still has active invoices tied to it, the database engine will reject your query and throw a Foreign Key Violation Error.
To handle these relational boundaries, you must configure or manage your schemas using one of three strategies:
- Manual Sequential Purging: You must write an initial
DELETEquery targeting the child table (invoices) to clear out the dependent records first, before running a secondary query to remove the parent row (accounts). - ON DELETE CASCADE: You can configure your foreign key constraint to use cascading deletes. When this is active, deleting a parent row tells the engine to automatically track down and wipe out all corresponding child rows across the database. While convenient, this requires immense caution, as a single delete can trigger a massive domino effect across multiple tables.
- ON DELETE SET NULL: This configuration unlinks the child data instead of destroying it. When a parent row is removed, the database engine automatically changes the foreign key pointer column in the child table to a
NULLmarker, archiving the record safely without breaking relational rules.
Step-by-Step Tutorial: Executing a Production Data Purge
When executing a real-world data maintenance task, follow this systematic workflow to minimize risk and protect system performance:
1. Validate Target Record Counts with SELECT Queries: Scope Auditing.
Construct a descriptive SELECT query utilizing the exact WHERE parameters you intend to deploy for data removal. Review the returned dataset size to confirm it aligns with your expected data cleanup scope.
2. Isolate Deletions Inside Explicit Transactions: Defensive Execution.
Wrap your DELETE command inside a BEGIN TRANSACTION block. Execute the query, inspect the system feedback to ensure the number of affected rows matches your step 1 audit, and issue a COMMIT only after verification.
3. Reclaim Allocated Disk Space and Rebuild Indexes: Storage Optimization.
Running massive deletions leaves behind empty space page fragments on your storage drives. Execute an index rebuild (ALTER INDEX ALL REBUILD) or a table vacuum command to defragment the storage heap and restore high-speed query execution performance.
Final Thoughts:
Deleting data from an SQL table is an essential operational task, but it requires technical discipline. Use DELETE with a tightly defined WHERE clause when you need to remove precise, granular rows. Lean on TRUNCATE when you need to rapidly wipe an entire staging layout without bloating your transaction log files.
Finally, always protect your production environment by testing filters via SELECT statements and wrapping data manipulation queries in explicit transactions. By enforcing these structural habits, you manage your database lifecycle with complete confidence and authority.
You may also like the following articles:
- How to Write SQL Queries
- How to Find Duplicate Records in SQL
- How to Delete Stored Procedures in SQL Server
- How to Delete Duplicate Records in SQL Server
After working for more than 15 years in the Software field, especially in Microsoft technologies, I have decided to share my expert knowledge of SQL Server. Check out all the SQL Server and related database tutorials I have shared here. Most of the readers are from countries like the United States of America, the United Kingdom, New Zealand, Australia, Canada, etc. I am also a Microsoft MVP. Check out more here.