
In this comprehensive article, I will walk you through my professional troubleshooting framework to diagnose and fix SSMS connection errors with the confidence of an expert.
SSMS Cannot Connect To Server
Before we start clicking buttons, we need to understand the mechanics. When you open SQL Server Management Studio (SSMS) and hit “Connect,” the client sends a request across the network (or local pipe) to the SQL Server Browser or directly to the Database Engine. If that “handshake” fails, SSMS throws a generic error.
The most common culprits are:
- Error 26: Error Locating Server/Instance Specified.
- Error 40: Could not open a connection to SQL Server.
- Error 18456: Login failed (Authentication issues).
Phase 1: The 60-Second Check
I always start with the basics.
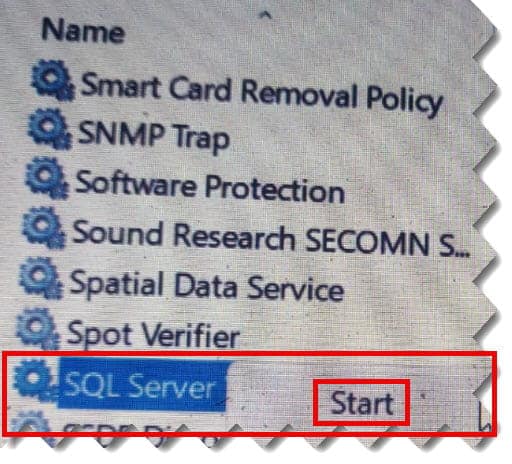
1. Is the SQL Server Service Running?
If the engine isn’t running, the door is locked.
- Open SQL Server Configuration Manager or
services.msc. - Locate the service named SQL Server (MSSQLSERVER) (for default instances) or SQL Server (InstanceName).
- Ensure the status is Running. If it is “Stopped,” right-click and select Start.
2. Verify the Server Name Syntax
Typing the wrong server name is the #1 cause of Error 26.
- Default Instance: Use the computer name (e.g.,
NYC-PROD-DB01) or.for local. - Named Instance: Use
ComputerName\InstanceName(e.g.,NYC-PROD-DB01\DEVELOPMENT). - The “Period” Trick: For a local default instance, simply typing a single period
.or(local)in the server name box is the fastest way to connect.

Phase 2: Enabling Network Protocols
By default, SQL Server is installed with high security, which often means remote connections are disabled. If you are trying to connect from a satellite office in Phoenix to a server in Chicago, you must enable the right lanes.
Enabling TCP/IP
- Open SQL Server Configuration Manager.
- Navigate to SQL Server Network Configuration > Protocols for [YourInstance].
- Right-click TCP/IP and select Enable.
- Crucial: You must restart the SQL Server service for this to take effect.
Phase 3: The Firewall
In the USA corporate world, security is paramount, and the Windows Firewall is often the reason SSMS cannot talk to the server. The server might be listening on Port 1433, but the firewall is blocking the incoming request.
Configuring Inbound Rules
You don’t need to disable your firewall; you just need a surgical exception.
- Open Windows Defender Firewall with Advanced Security.
- Click Inbound Rules > New Rule.
- Select Port > TCP > Specific local ports: 1433.
- Select Allow the connection.
- Name it
SQL_1433_Inbound.
The SQL Browser Service
If you are using a Named Instance, you must also open UDP Port 1434. This allows the SQL Browser service to tell your client which dynamic port the named instance is currently using.
Phase 4: Troubleshooting Remote Connections
If the ports are open but you still can’t connect, the SQL Server instance itself might be told to ignore remote requests.
- Connect to the server locally (if possible).
- Right-click the server in Object Explorer and select Properties.
- Go to the Connections page.
- Ensure “Allow remote connections to this server” is checked.
Phase 5: Authentication Failures (Error 18456)
If you get as far as an authentication prompt but it fails, the “handshake” was successful, but your “ID” was rejected.
Mixed Mode Authentication
Many firms use a mix of Windows logins and specific SQL logins (like sa).
- Go to Server Properties > Security.
- Ensure “SQL Server and Windows Authentication mode” is selected.
- If you switch from Windows-only to Mixed Mode, a service restart is mandatory.
| Error Component | Likely Cause | Fix Action |
| Error 26 | Wrong Name/Instance | Check spelling or SQL Browser service. |
| Error 40 | Network/Firewall | Open Port 1433 or enable TCP/IP. |
| Error 18456 | Login/Permissions | Verify credentials or enable Mixed Mode. |
| Network Path Not Found | DNS/VPN Issues | Test connection via IP address instead of name. |
Phase 6: Professional Testing Tools
1. The PowerShell “Ping”
Open PowerShell and run this command to see if the port is actually reachable:
PowerShell
Test-NetConnection -ComputerName YourServerName -Port 1433If TcpTestSucceeded is True, the network is fine—the problem is your SQL permissions.
2. The UDL File Trick
This is my “secret weapon” for testing connectivity without opening SSMS.
- Create a blank file on your desktop named
test.udl. - Double-click it.
- Enter your server and login info.
- Click Test Connection. This uses the native Windows OLE DB provider and is the purest test of connectivity available.
Advanced Scenarios: VPN and Multi-Subnet Clusters
- VPN Latency: If you are on a slow VPN, SSMS might “time out” before the server responds. You can increase the Connection Timeout in the SSMS connection dialog under “Options” > “Connection Properties.”
- Multi-Subnet Failover: If you are connecting to an Always On Availability Group, ensure your connection string (or SSMS options) includes
MultiSubnetFailover=True.
Step-by-Step Tutorial
We follow this exact sequence:
- Verify Service: Is SQL Server running? (Check Configuration Manager).
- Verify Name: Are we using
Server\Instancecorrectly? - Check Protocols: Is TCP/IP enabled?
- Test Port: Can we reach the server via PowerShell on 1433?
- Check Firewall: Is there an inbound rule for SQL?
- Verify Login: Is the account locked out or using the wrong password?
- Check SQL Browser: (For named instances) Is it running?
Conclusion
“SSMS cannot connect to server” is a broad error, but with a systematic approach, it is always solvable. By following this authoritative guide, you move from guessing to knowing. Start with the service, check the protocols, verify the firewall, and finally validate the authentication.
You may also like the following articles:
- How to Connect to Azure SQL Database from SSMS
- SQL Server Error 18456
- How to find SQL Server instance name in SSMS
- SQL Select Query Examples
- How To Insert Data In SSMS
After working for more than 15 years in the Software field, especially in Microsoft technologies, I have decided to share my expert knowledge of SQL Server. Check out all the SQL Server and related database tutorials I have shared here. Most of the readers are from countries like the United States of America, the United Kingdom, New Zealand, Australia, Canada, etc. I am also a Microsoft MVP. Check out more here.